By: Team T11-B3 Since: Aug 2017 Adapted from AddressBook-Level4, by: Team SE-EDU Since Jun 2016 Licence: MIT
- 1. Welcome to Mobilize!
- 2. Setting up
- 3. Design
- 4. Implementation
- 4.1. SwitchMode mechanism
- 4.2. Add contact mechanism: birthday parameter
- 4.3. Detag mechanism
- 4.4. FindTag mechanism
- 4.5. Tag mechanism
- 4.6. TagTask Mechanism
- 4.7. AddTask mechanism
- 4.8. EditTask Mechanism
- 4.9. DeleteTask mechanism
- 4.10. FindTask mechanism
- 4.11. ListTask mechanism
- 4.12. SelectTask mechanism
- 4.13. Calendar mechanism
- 4.14. Undo/Redo mechanism
- 5. Logging
- 6. Configuration
- 7. Documentation
- 8. Testing
- 9. Dev Ops
- Appendix A: User Stories
- Appendix B: Use Cases
- Appendix C: Non Functional Requirements
- Appendix D: Glossary
- Appendix E: Product Survey
1. Welcome to Mobilize!
Mobilize is a desktop application built to help people organize their contacts and tasks. It is primarily written in Java and uses the Object Oriented Paradigm. Continuous Integration is done by the Travis-CI. Code quality checks are maintained by Codacy and Coveralls tests the coverage of tests in the application.
This Developer Guide will help you get started in understanding the architecture of the software and the mechanism of its features. It assumes prior knowledge of Java and Object Oriented Programming.
2. Setting up
2.1. Prerequisites
Make sure you have the following before getting started:
-
JDK
1.8.0_60or laterHaving any Java 8 version is not enough.
This app will not work with earlier versions of Java 8. -
IntelliJ IDE
IntelliJ by default has Gradle and JavaFx plugins installed.
Do not disable them. If you have disabled them, go toFile>Settings>Pluginsto re-enable them.
2.2. Setting up the project in your computer
Follow these steps to get started:
-
Fork this repo, and clone the fork to your computer.
-
Open IntelliJ (if you are not in the welcome screen, click
File>Close Projectto close the existing project dialog first). -
Set up the correct JDK version for Gradle.
-
Click
Configure>Project Defaults>Project Structure. -
Click
New…and find the directory of the JDK.
-
-
Click
Import Project. -
Locate the
build.gradlefile and select it. ClickOK. -
Click
Open as Project. -
Click
OKto accept the default settings. -
Open a console and run the command
gradlew processResources(Mac/Linux:./gradlew processResources). It should finish with theBUILD SUCCESSFULmessage.
This will generate all resources required by the application and tests.
2.3. Verifying the setup
To verify that the project has been set up correctly:
-
Run the
seedu.address.MainAppand try a few commands. -
Run the tests to ensure they all pass.
2.4. Configurations to do before writing code
2.4.1. Configuring the coding style
This project follows oss-generic coding standards. IntelliJ’s default style is mostly compliant with ours but it uses a different import order from ours. To rectify:
-
Go to
File>Settings…(Windows/Linux), orIntelliJ IDEA>Preferences…(macOS) -
Select
Editor>Code Style>Java -
Click on the
Importstab to set the order:-
For
Class count to use import with '*'andNames count to use static import with '*': Set these to999to prevent IntelliJ from contracting the import statements. -
For
Import Layout: Set these in order beginning withimport static all other imports,import java.*,import javax.*,import org.*,import com.*and ending withimport all other imports. Add a<blank line>between eachimport.
-
Optionally, you can follow the UsingCheckstyle.adoc document to configure Intellij to check if your code is compliant with our style.
2.4.2. Setting up CI
Set up Travis to perform Continuous Integration (CI) for your fork. See UsingTravis.adoc to learn how to set it up.
Optionally, you can set up AppVeyor as a second CI (see UsingAppVeyor.adoc).
| Having both Travis and AppVeyor ensures your App works on both Unix-based platforms and Windows-based platforms (Travis is Unix-based and AppVeyor is Windows-based). |
2.4.3. Getting started with coding
When you are ready to start coding:
-
Get some sense of the overall design by reading the Architecture section.
-
Take a look at the Implementation section to understand how some of the key features are implemented.
3. Design
3.1. Architecture
The Architecture Diagram given below displays the high-level design of the Application.

Figure 2.1.1 : Architecture Diagram
Given below is a quick overview of each component:
Main has only one class called MainApp. It is responsible for,
-
Initializing the components in the correct sequence, and connecting them to each other, when the application is launched.
-
Shutting down the components and invokes cleanup method where necessary, when the application is shut down.
Commons represents a collection of classes used by multiple components. Two of those classes play important roles at the architecture level.
-
EventsCenter: This class (written using Google’s Event Bus library) is used by components to communicate with other components using events (i.e. a form of Event Driven design) -
LogsCenter: This class is used by many classes to write log messages to the Application’s log file.
The rest of the Application consists of four components.
Each of the four components:
-
Defines its API in an
interfacewith the same name as the Component. -
Exposes its functionality using a
{Component Name}Managerclass.
For example, the Logic component (see the class diagram given below) defines it’s API in the Logic.java interface and exposes its functionality using the LogicManager.java class.
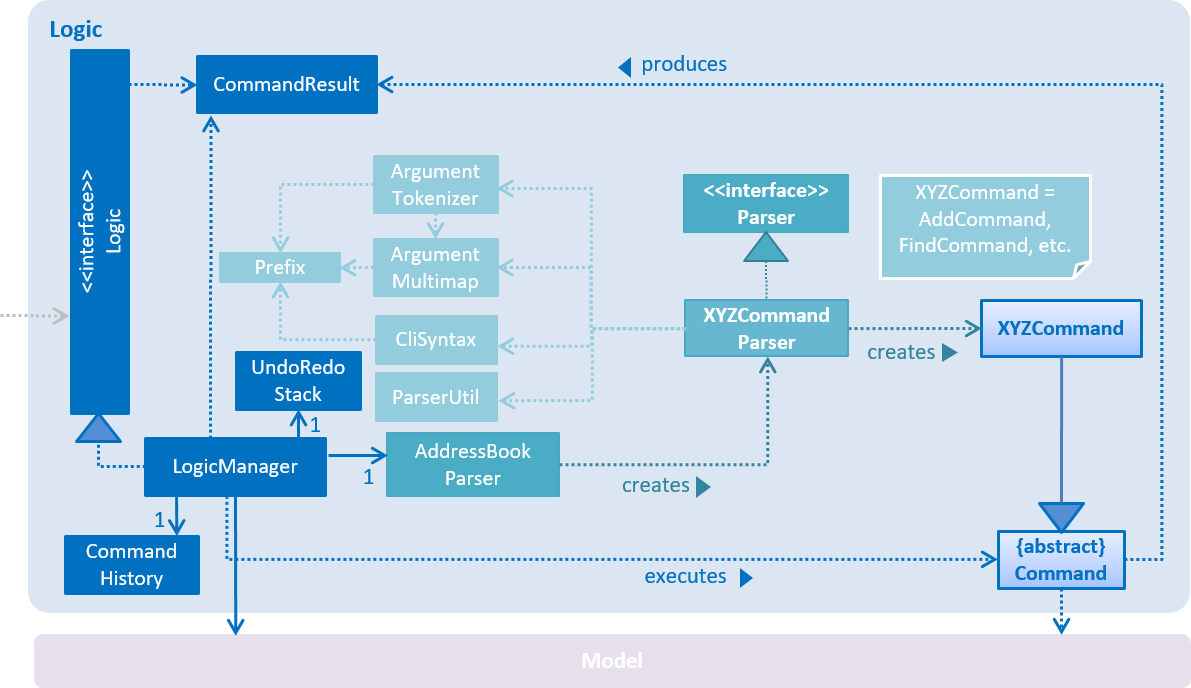
Figure 2.1.2 : Class Diagram of the Logic Component
Events-Driven nature of the design
The events-driven nature of the design enables events to be propagated through the EventsCenter to the Storage and UI without Model having to be coupled to either of them. This is an example of how this event-driven approach helps us reduce direct coupling between components.
The Sequence Diagram below illustrates an example, showing how the components interact for the scenario where the user issues the command delete 1.
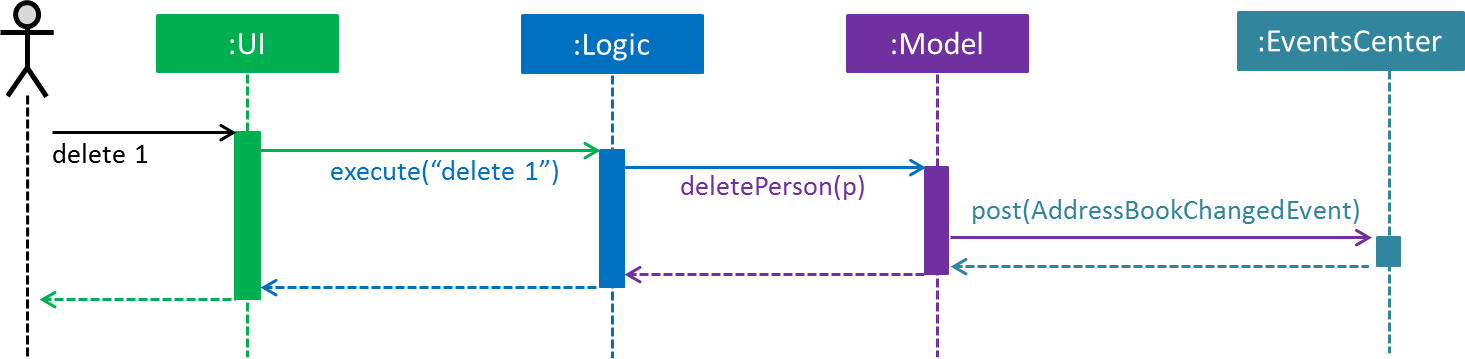
Figure 2.1.3a : Component interactions for delete 1 command (part 1)
Note how the Model simply raises an AddressBookChangedEvent when the Address Book data is changed, instead of asking the Storage to save the updates to the hard disk.
|
The diagram below shows how the EventsCenter reacts to that event, which eventually results in the updates being saved to the hard disk and the status bar of the UI being updated to reflect the 'Last Updated' time.
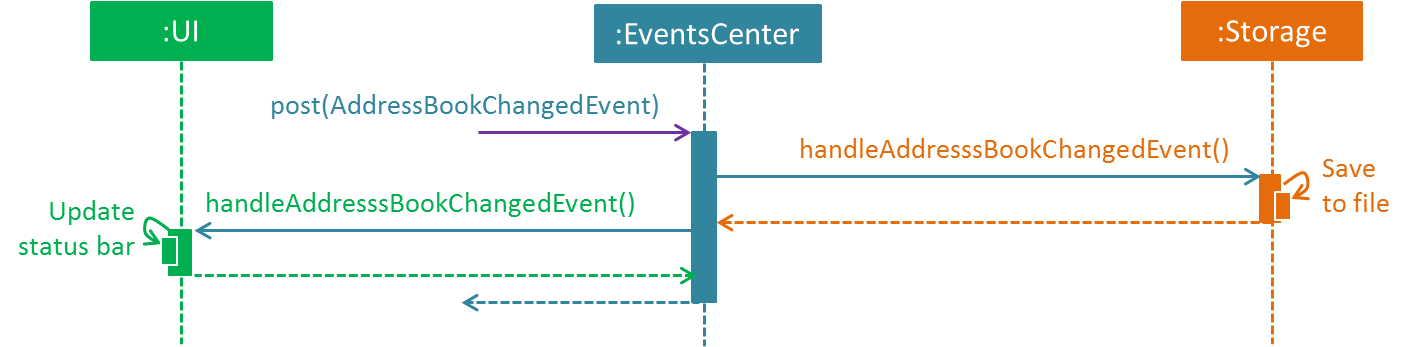
Figure 2.1.3b : Component interactions for delete 1 command (part 2)
The next few sections give more details of each component.
3.1.1. UI component
The following diagram shows the structure of the UI Component:
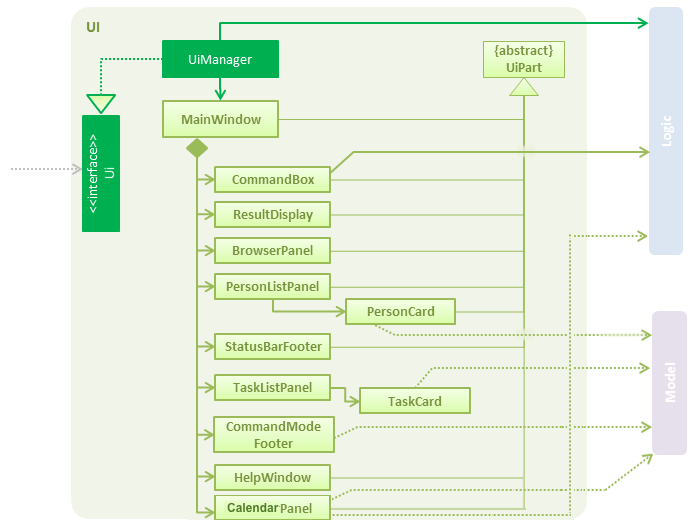
Figure 2.2.1 : Structure of the UI Component
API : Ui.java
The UI consists of a MainWindow that is made up of parts e.g.CommandBox, ResultDisplay, PersonListPanel, StatusBarFooter, BrowserPanel, TaskListPanel etc. All these, including the MainWindow, inherit from the abstract UiPart class.
The UI component uses JavaFx UI framework. The layout of these UI parts are defined in matching .fxml files that are in the src/main/resources/view folder. For example, the layout of the MainWindow is specified in MainWindow.fxml
It Executes user commands using the Logic component and binds itself to some data in the Model so that the UI can update automatically when data in the Model changes. It is also responsible for updating the UI based on events raised from various parts of the Application.
3.1.2. Logic component
The following diagram shows the structure of the Logic Component:
Figure 2.3.1 : Structure of the Logic Component
The Logic Component consists of an interface Logic which is implemented directly or indirectly by all other classes, e.g.
LogicManager, CommandResult etc.
The Logic Component is where all Commands are situated and structured. This is elaborated below:
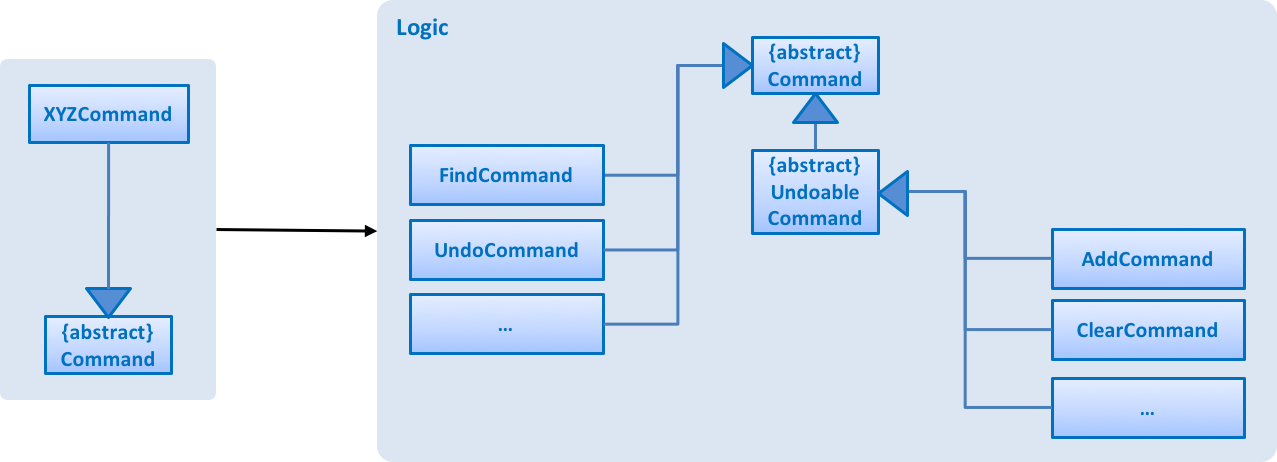
Figure 2.3.2 : Structure of Commands in the Logic Component. This diagram shows finer details concerning XYZCommand and Command in Figure 2.3.1
API :
Logic.java
When a Command is executed, the Logic Component uses the AddressBookParser class to parse the user command. This results in a Command object which is executed by the LogicManager, which can subsequently affect the Model (e.g. adding a person) and/or raise events. The result of the command execution is encapsulated as a CommandResult object which is passed back to the Ui.
Given below is the Sequence Diagram for interactions within the Logic component for the execute("delete 1") API call.
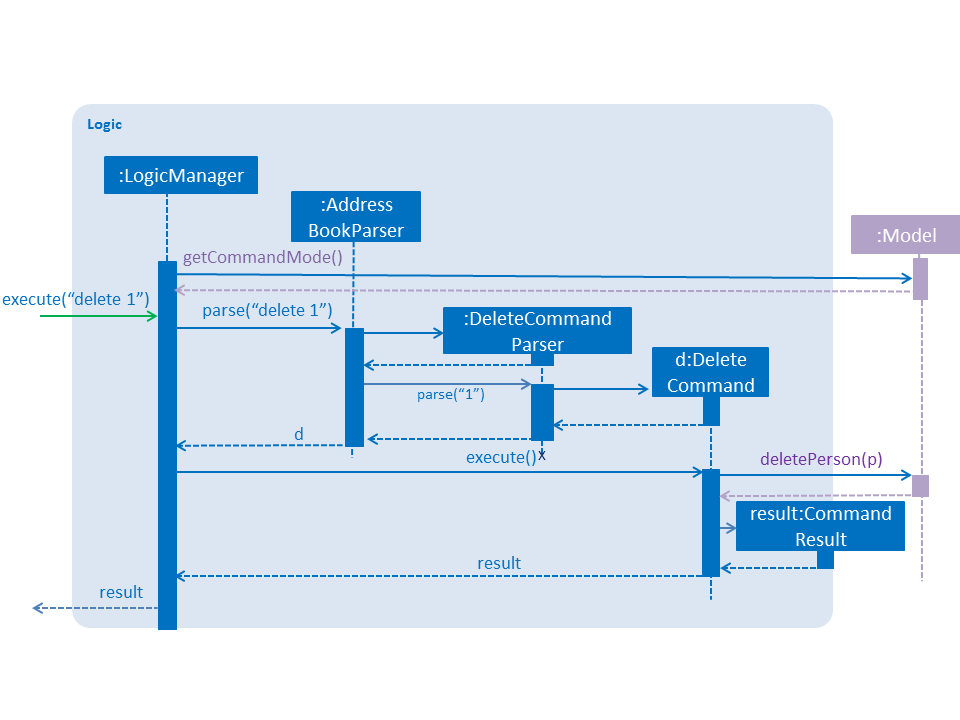
Figure 2.3.1 : Interactions Inside the Logic Component for the delete 1 Command
3.1.3. Model component
The following shows a diagram for the Model Component:
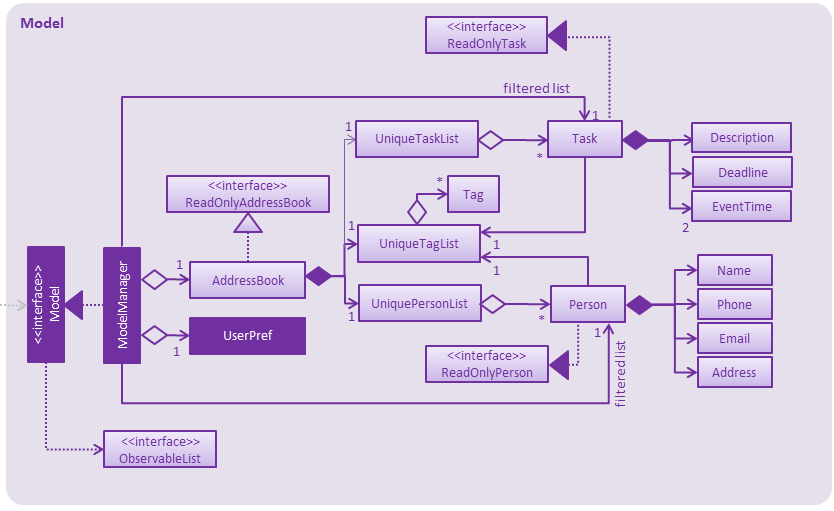
Figure 2.4.1 : Structure of the Model Component
API : Model.java
The Model Component does the following stores Mobilize date and a UserPref object that represents the user’s preferences.
It exposes an unmodifiable ObservableList<ReadOnlyPerson> that can be 'observed' e.g. the UI can be bound to this list so that it automatically updates when the data in the list changes.
The Model does not depend on any of the other three components.
3.1.4. Storage component
The following diagram represents the Storage Component:
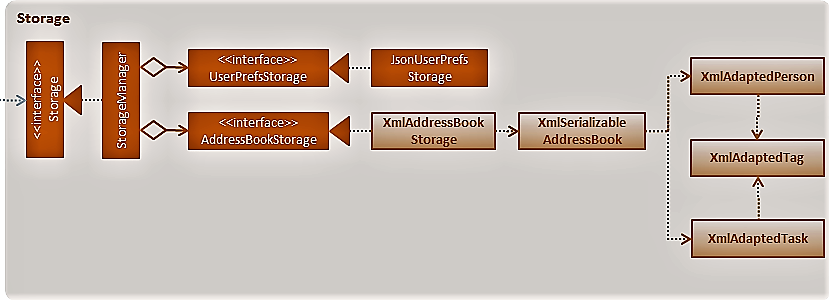
Figure 2.5.1 : Structure of the Storage Component
API : Storage.java
The Storage component saves UserPref objects in json format and read it back. It is also responsible for saving Mobilize data in XML format and reading it back.
3.2. Common classes
Classes used by multiple components are in the seedu.addressbook.commons package.
4. Implementation
This section describes some noteworthy details on how certain features are implemented.
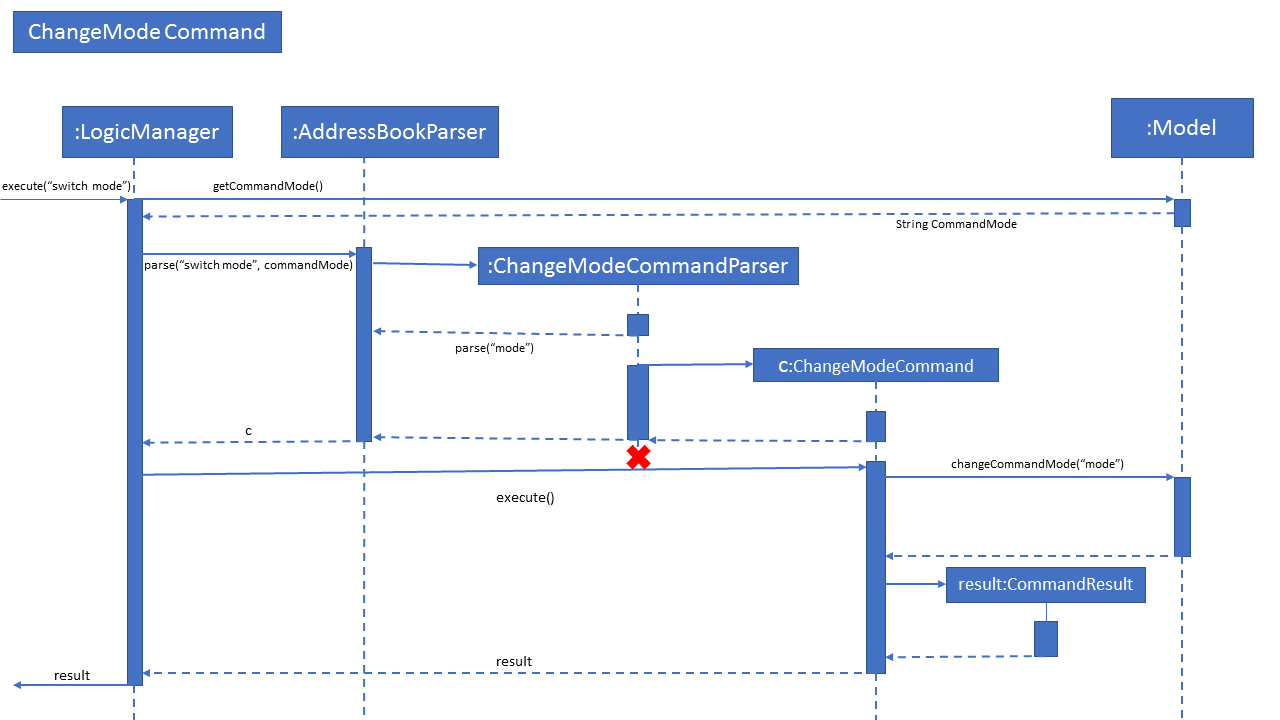
4.1. SwitchMode mechanism
The switchMode mechanism is facilitated by the ChangeModeCommand class which inherits from Command class. It allows the user switch between 2 sets of command for either addressbook or taskmanager.
Suppose the user has just executed the ChangeMode using:
switch addressbook(ab) or taskmanager(tm).
In any command mode, the execute() function of the LogicManager class is first called, which calls Model.getCommandMode() to check the current command mode and goes on to pass the command string and command mode string into the parseCommand() function of the AddressBookParser class. This, in turn, determines that the ChangeModeCommand feature is being evoked and calls the ChangeModeCommandParser to parse the string and compare with the current set of command: addressbook(ab) or taskmanager(tm). After validating the input with command mode prefix, ChangeModeCommand(input) is created and calles the excute() feature in ChangeModeCommand which then call Model.changeCommandMode(input) to change the current command mode and return a CommandResult object.
A diagram is shown below to illustrate this mechanism.
4.2. Add contact mechanism: birthday parameter
Addition of the birthday parameter is facilitated by the AddCommand class which inherited from the UndoableCommand class. It allows user to add the birthday of the contact by putting another parameter into the AddCommand.
Suppose the user has just executed the AddCommand using AddCommand using the following:
`add n/eryao p/96965340 e/lite0520@gmail.com a/blk 254, ang mo kio b/08-12-1995`
The AddCommandParser class will check for the validity of the parameter entered. Afterwards, the LogicManager invokes the method AddCommand, which creates a new person and update the storage.
If the birthday parameter is not specified, the AddCommand will give an invalid command message.
|
4.3. Detag mechanism
The detag mechanism is facilitated by the DetagCommand class which is inherited from the UndoableCommand class. It allows for the removal of existing tags from multiple contacts, i.e. detag. The minimum number of contacts that can be specified is 1 and the maximum number is the number of contacts in the current list.
Suppose the user executes the command detag using the following code:
`detag 1, 2 t/friends`
The DetagCommandParser class will check for the validity of the indices specified, i.e. within the range of the filtered list. Afterwards, the LogicManager invokes the method deleteTag, which removes the specific tag from the Set of tags from the specified contacts, and updates the storage.
| If one or more of the contacts specified by the indices does not contain the specified tag to remove, the removal will not be executed even for those contacts that have the tag. |
| The current detag mechanism does not support multiple tag removal, i.e. remove 2 different tags in one command line. |
Design Considerations
Aspect: Implementation of DetagCommand
Alternative 1 (current choice): Directly removes the tag from Set of contact(s)
Pros: Easier and more specific command to remove a tag, and allows removal from multiple contacts in one command
Cons: Introduction of new command specifically for the removal of a tag may not be necessary.
Alternative 2: Just use the EditCommand to change the tag
Pros: Use of one command to edit any details of a person is more organised.
Cons: Cannot not remove tags of multiple contacts, and it is mandatory to retype the tags that do not need to be removed.
4.4. FindTag mechanism
The FindTag mechanism is facilitated by the FindCommand class which inherits from the Command class. It allows the user to find contacts using tags. Users can search using multiple tags too.
Suppose the user has just executed the FindCommand using:
`find friends`
At first, the execute() function of the LogicManager class is called, which goes on to pass the command string into the parseCommand() function of the AddressBookParser class. This, in turn, determines that the FindCommand feature is being evoked and calls the FindCommandParser to parse the string and compare the tags. These are validated and formatted by the TagContainsKeywordsPredicate and returned as a TagContainsKeywordsPredicate object to be used to call the FindCommand class. The LogicManager then calls the execute() in the FindCommand class which creates and returns a CommandResult object.
Commands that are not undoable are implemented this way:
public class FindCommand extends Command {
    @Override
    public CommandResult execute() {
        // ... find logic ...
    }
}
FindCommand will call this class:
public class PersonContainsKeywordsPredicate implements Predicate<ReadOnlyPerson> {
@Override
    public boolean test(ReadOnlyPerson person) {
        String tag = Arrays.toString(person.getTags().toArray())
                .replaceAll("[\\[\\](),{}]", "");
        return keywords.stream()
                .anyMatch(keyword -> StringUtil.containsWordIgnoreCase(person.getName().fullName, keyword)
                || StringUtil.containsWordIgnoreCase(tag, keyword)
                || StringUtil.containsWordIgnoreCase(person.getBirthday().value, keyword));
    }
4.5. Tag mechanism
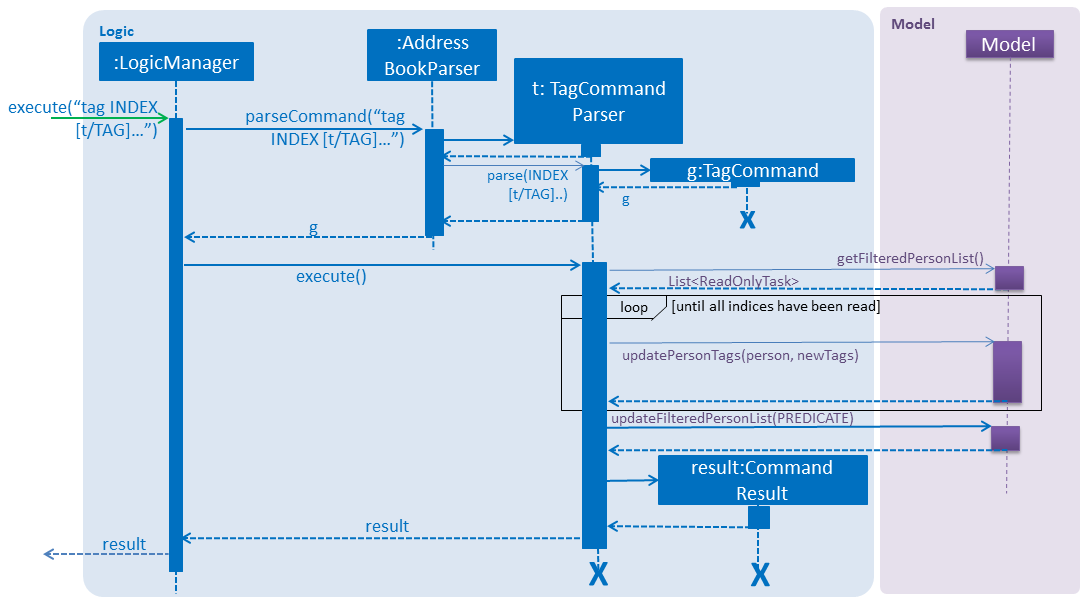
The Tag mechanism is a specialised form of the edit feature that allows users to tag multiple contacts with multiple tags.
The mechanism is facilitated by the TagCommand class which inherits from the UndoableCommand class, indicating that it can be undone.
Suppose the user has just executed the TagCommand using:
`tag 1,2 t/friend t/classmate`.
At first the command is called, which causes LogicManager to pass the command string to the parseCommand() function of the AddressBookParser class. This determines that the TagCommand feature is being evoked
and calls the TagCommandParser class.
Here, the arguments are validated and tokenized and new TagCommand object is returned with parsed indices and tags.
The ModelManager class in the Model component is then called to update all the tags of the respective people using the updatePersonTags() method.
The Storage and UI are subsequently updated with the new information.
The following sequence diagram summarizes how this operation works:
The TagCommand skips over the invalid indices and attempts to tag the contacts who are in the valid indices. If no valid indices are found, then an error is thrown. This is done by the following:
/**
 * Filters the valid indices in a given array of indices.
 */
public static Index[] filterValidIndices(int lastShownListSize, Index[] indices) {
    assert indices != null;
    assert lastShownListSize != 0;
    return Arrays.stream(indices)
            .filter(currentIndex -> currentIndex.getZeroBased() < lastShownListSize)
            .toArray(Index[]::new);
}
Index[] validIndices = CommandUtil.filterValidIndices(lastShownList.size(), indices);
if (validIndices.length == 0) {
    throw new CommandException(Messages.MESSAGE_INVALID_PERSON_DISPLAYED_INDEX);
}
4.6. TagTask Mechanism
This works in a similar way to the above.
4.7. AddTask mechanism
The Add Task mechanism is facilitated by the AddTaskCommand class which inherits from the UndoableCommand class. It allows for the addition of new tasks to the application with a starting date and a deadline. Both dates are optional and may be omitted.
Suppose the user has just executed the add command using:
`add CS assignment by tomorrow at 23:59`.
At first, the command is called is called, which causes the LogicManager to pass the command string into the parseCommand() function of the AddressBookParser class. This, in turn, determines that the AddTask feature is being evoked and calls the AddTaskCommandParser to parse the String and separate it into three components: Description, StartDate and Deadline. These are validated and formatted by the Task class and returned as a Task object to be used to call the AddTaskCommand class. The LogicManager then calls the executeUndoableFunction() in the AddTaskCommand class which creates and returns a CommandResult object.
The following sequence diagram summarizes how this operation works:
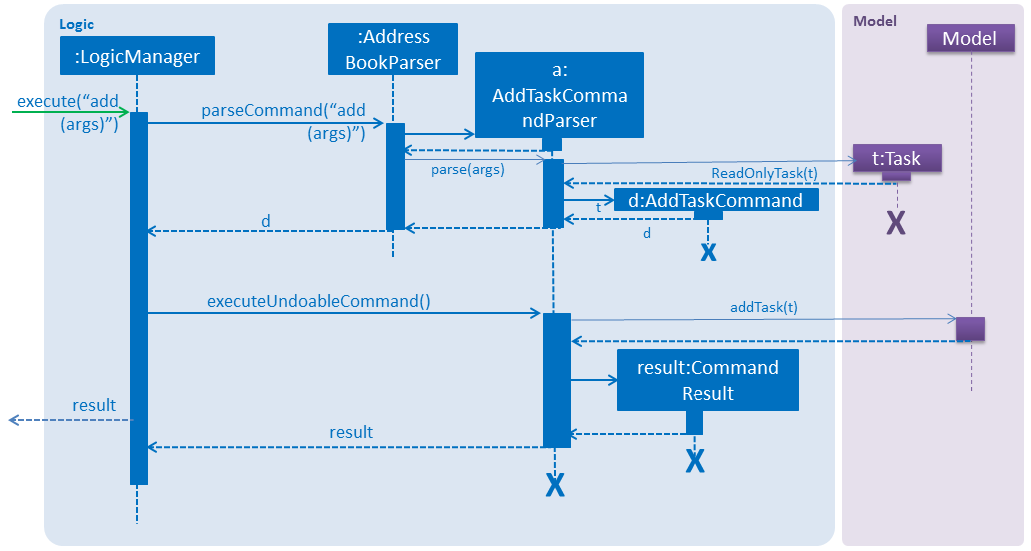
All parameters except the description are set to be optional wherein an empty string is added when no value is stated by a user.
Natural Language Input is processed by the PrettyTime NLP, in the ParserUtil class in the following way:
public static Optional<EventTime[]> parseEventTimes(Optional<String> dateTime) throws IllegalValueException {
    requireNonNull(dateTime);
    if (dateTime.isPresent()) {
        List<DateGroup> dateGroup = new PrettyTimeParser().parseSyntax(dateTime.get().trim());
        if (dateGroup.isEmpty()) {
            throw new IllegalValueException(DateTimeValidator.MESSAGE_TIME_CONSTRAINTS);
        }
        List<Date> dates = dateGroup.get(dateGroup.size() - 1).getDates();
String endTime = DateTimeFormatter.formatTime(dates.get(dates.size() - 1));
String startTime = dates.size() > 1 ? DateTimeFormatter.formatTime(dates.get(dates.size() - 2)) : "";
        return Optional.of(new EventTime[]{new EventTime(startTime), new EventTime(endTime)});
    } else {
        return Optional.empty();
    }
}
/**
 * Parses a {@code String naturalLanguageInput} using PrettyTime NLP, into a {@code Date}.
 * @throws IllegalValueException if the date cannot be parsed from the phrase or if the given date is invalid.
 */
public static Date parseDate(String naturalLanguageInput) throws IllegalValueException {
    List<DateGroup> dateGroup = new PrettyTimeParser().parseSyntax(naturalLanguageInput.trim());
    if (dateGroup.isEmpty() | !DateTimeValidator.isDateValid(naturalLanguageInput)) {
        throw new IllegalValueException(DateTimeValidator.MESSAGE_DATE_CONSTRAINTS);
    }
    List<Date> dates = dateGroup.get(dateGroup.size() - 1).getDates();
    return dates.get(dates.size() - 1);
}
Design Considerations
Aspect: Creating classes for StartDate and Deadline
Alternative 1 (current choice): Use Strings to contains the StartDates and Deadlines.
Pros: * Easy to assign an empty string to the instance variable so that the dates are optional and do not show up in the UI.
In addition, dates can be stored after being formatted to a more user-friendly style (i.e. Tue, Oct 24, '17). This prevents dates from becoming confusing (i.e. distinguishing between dd-MM-yyyy and mm-DD-yyyy)
Cons: Dates are not stored the correct format. This makes it more difficult to compare and validate later on as they have to be reformatted into Date objects every time. For example,
in validating whether a start date is indeed before a deadline.
Alternative 2: Use java.time.LocalDate class.
Pros: Dates are in correct format. Validation becomes easier and reformatting is not necessary.
Cons: LocalDate cannot be initialized when no input is given. Using a phony value of 00:00 or the current date might cause errors in validation and sorting of dates.
Alternative 3: Use java.util.Optional class for instance variables along with the LocalDate class.
Pros: Easy to understand reasoning, for new developers looking to contribute. Easy to format specifically for display (once) and allows empty values when no dates are supplied.
Cons The general agreement in the software engineering community seems to be that it is better not to use extra wrapping for an instance variable, that might pose problems in unwrapping later on.
Aspect: Natural Language Processing
Alternative 1 (current choice): Use an external library (PrettyTime) to process dates in natural language after they have been tokenized by their respective prefixes
and categorized according to type.
Pros Dates are sure to be instantiated according to the correct class.
Cons Command format becomes less flexible.
Alternative 2: Parse all dates first then scan the argument string for keywords.
Pros More flexible command format and consequently, more user-friendly.
Cons Open to more mistakes in setting starting dates and deadlines.
Aspect: Setting prefixes for adding tasks
Alternative 1 (current choice): Use natural language prefixes i.e. from, to, by
Pros Easier to type and remember.
Cons Difficult to implement as descriptions containing these words must be separated from dates.
Alternative 2 Use slashes such as in task commands i.e. f/, o/, b/ etc.
Pros Faster to type.
Cons Description might contain slashes. t/ (to) would clash with t/ prefix for tags so to/ would have to be used.
Limits possibilities of adding new prefixes and making the format more flexible in the future.
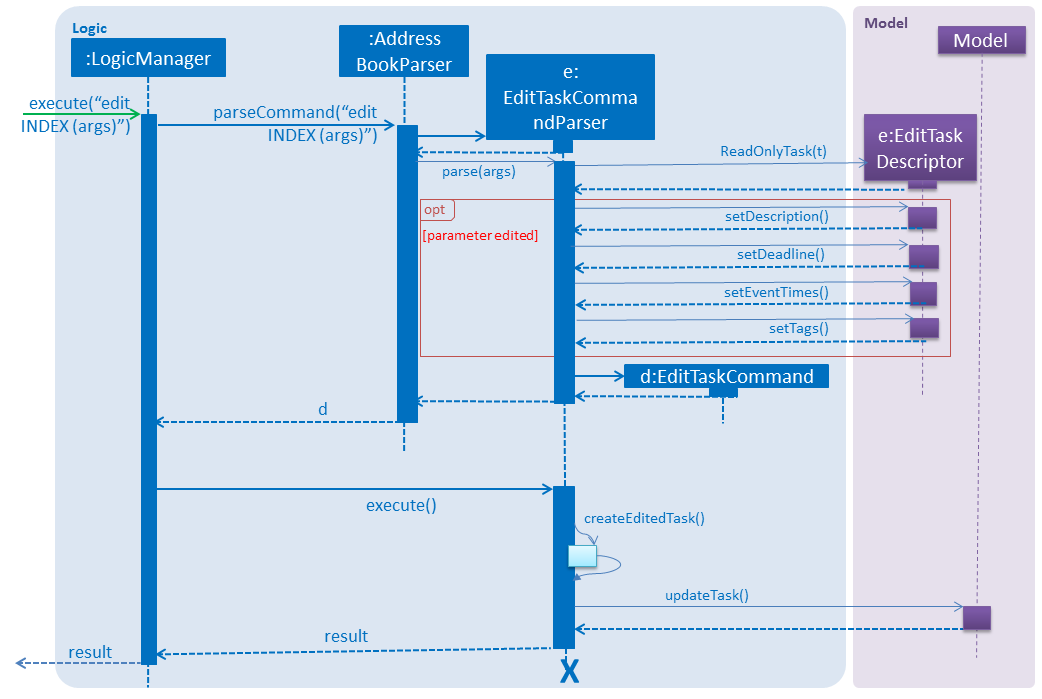
4.8. EditTask Mechanism
The EditTask Mechanism is facilitated by the EditTaskCommand class and allows th euser to edit any parameter of a given task.
Suppose the user has just executed the command:
edit 1 finish homework by sunday at 9 am to 12 pm
---
The command is passed by the LogicManager class to the AddressBookParser which goes on to pass it to the EditTaskCommandParser
class. Here a new EditTaskDescriptor is created using the newly specified parameters while old parameters are copied. Finally,
a newly edited person is created and the Model is called to update the task using the UpdateTask() method.
The following sequence diagram summarizes how this operation works:
The optional parameters are assigned in the following manner in the EditTaskCommandParser:
            parseDescriptionForEdit(argMultimap.getPreamble()).ifPresent(editTaskDescriptor::setDescription);
            parseDeadlineForEdit(argMultimap.getAllValues(PREFIX_DEADLINE_BY, PREFIX_DEADLINE_FROM, PREFIX_DEADLINE_ON))
                    .ifPresent(editTaskDescriptor::setDeadline);
            parseEventTimesForEdit(argMultimap.getAllValues(PREFIX_TIME_AT))
                    .ifPresent(editTaskDescriptor::setEventTimes);
            ParserUtil.parseTagsForEdit(argMultimap.getAllValues(PREFIX_TAG)).ifPresent(editTaskDescriptor::setTags);
---
4.9. DeleteTask mechanism
The Delete Task mechanism is facilitated by the DeleteTaskCommand class which inherits from the UndoableCommand class. It allows for the removal of a task at a specified index.
Suppose the user has just executed the delete command using:
`delete 2`.
At first, the execute() function of the LogicManager class is called, which goes on to pass the command string into the parseCommand() function of the AddressBookParser class. This, in turn, determines that the Delete feature is being evoked and calls the DeleteTaskCommandParser to parse the index and validate that the index provided is not out of bounds and returns a new task object to call the DeleteTaskCommand class. The LogicManager then calls the executeUndoableFunction() in the DeleteTaskCommand class which creates and return a CommandResult object.
public abstract class UndoableCommand extends Command {
    @Override
    public CommandResult execute() {
        // ... undo logic ...

        executeUndoableCommand();
    }
}

public class DeleteTaskCommand extends UndoableCommand {
    @Override
    public CommandResult executeUndoableCommand() {
        // ... deletetask logic ...
    }
}
4.10. FindTask mechanism
The FindTask mechanism is facilitated by the FindTaskCommand class which inherits from Command class. It allows the user to find tasks using descriptions. User can search using multiple descriptions too.
Suppose the user has just executed the FindTaskCommand using:
`find finish cs2103 17-07-1995`.
At first, the execute() function of the LogicManager class is called, which goes on to pass the command string into the parseCommand() function of the AddressBookParser class. This, in turn, determines that the FindTaskCommand feature is being evoked and calls the FindTaskCommandParser to parse the string and compare the descriptions. These are validated and formatted by the TaskContainsKeywordsPredicate and return as a TaskContainsKeywordsPredicate object to be used to call the FindTaskCommand class. The LogicManager then calls the execute() in the FindTaskCommand class which creates and return a CommandResult object.
public class TaskContainsKeywordsPredicate implements Predicate<ReadOnlyTask> {
    private final List<String> keywords;

    public TaskContainsKeywordsPredicate(List<String> keywords) {
        this.keywords = keywords;
    }

    @Override
    public boolean test(ReadOnlyTask task) {
        String testDate = "";
        String tag = Arrays.toString(task.getTags().toArray())
                .replaceAll("[\\[\\](),{}]", "");

        if (!task.getDeadline().isEmpty()) {
            try {
                Date date = ParserUtil.parseDate(task.getDeadline().date);
                DateFormat dateFormat = new SimpleDateFormat("dd-MM-yyyy");
                testDate = dateFormat.format(date);
            } catch (IllegalValueException e) {
                e.printStackTrace();
            }
        }
        String finalTestDate = testDate;
        return keywords.stream()
                .anyMatch(keyword -> StringUtil.containsWordIgnoreCase(task.getDescription().taskDescription, keyword)
                || StringUtil.containsWordIgnoreCase(finalTestDate, keyword)
                || StringUtil.containsWordIgnoreCase(tag, keyword));
    }
Design Considerations
Aspect: Implementation of FindTaskCommand
Alternative 1 (current choice): Use String Util.containsword() to find tasks.
Pros: Easy to find matching descriptions among all the tasks accurately.
Cons: The keywords have to be exactly the save i.e friend is not the same as friends.
Alternative 2: Use string.contains() to find tasks.
Pros: Keywords do not have to be exactly the same as those in the description of tasks.
Cons: The search result might not be accurate. For e.g. if the user searches using the keyword 'a' all the tasks’descriptions that contains the character 'a' will appear.
4.11. ListTask mechanism
The ListTask mechanism is facilitated by the ListTaskCommand class which inherits from Command class. It allows the user to list out all the current tasks.
Suppose the user has just executed the ListTaskCommand using:
`list`.
At first, the execute() function of the LogicManager class is called, which goes on to pass the command string into the parseCommand() function of the AddressBookParser class. This, in turn, determines that the ListTaskCommand feature is being evoked and calls the execute() in the ListTaskCommand class which update the current list to show all tasks creates and return a CommandResult object.
4.12. SelectTask mechanism
The SelectTask mechanism is facilitated by the SelectTaskCommand class which inherits from Command class. It allows the user to select the task at specific index.
Suppose the user has just executed the SelectTaskCommand using:
`select 2`
At first, the execute() function of the LogicManager class is called, which goes on to pass the command string into the parseCommand() function of the AddressBookParser class. This, in turn, determines that the SelectTaskCommand feature is being evoked and calls the SelectTaskCommandParser to parse the string and check if the index is valid. After validation the SelectTaskCommand class is been called. SelectTaskCommand will then paraphrase the tag of selected task and pass it through conductSearch. conductSearch will call model.updateFilteredPersonList() with PersonContainsKeywordsPredicate with keyword tag as parameter to find the tag among person list and update person list. If there are no match found, all person will be listed. Then LogicManager then calls the execute() in the SelectTaskCommand class which calls EventCenter with the parameter of JumpToTaskListRequestEvent class to highlight selected task card in Ui at target index. Then execute() creates and return a CommandResult object.
4.13. Calendar mechanism
The calendar mechanism is facilitated by the DatePickerSkin skin instance which capture the pop-up content from the DatePicker control in JavaFX. It allows the user to have a calendar view of all contacts' Birthday and tasks' Deadline.
Suppose the address book is modified (e.g. using add, edit, addtask, deletetask).
After the modification of Mobilize’s address book (i.e. saving of data to the addressbook.xml file), ObservableList of Person and Task classes stored in the address book are passed into the CalendarPanel Ui through Model.
Next, getDayCellFactory will format the DateCell of the DatePicker. The formatting is done with birthday and deadline as conditions and colour and tooltip of DateCell as variables to be change by the formatter.
By selecting the date on the calendar, the date value from the DatePicker will be captured and be parsed as a string. The string is then passed to Logic to execute the FindCommand which will show all contacts and tasks having Birthday and Deadline on that specific date.
[NOTE] Implementation of CLI for the calendar is still ongoing.
The following are examples of colour and tooltip of the calendar:
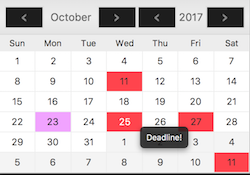
Figure 4.11.a: Tooltip and colour for Deadline
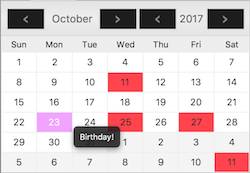
Figure 4.11.b: Tooltip and colour for Birthday
Design Considerations
Aspect: Implementation of Calendar
Alternative 1 (current choice): Use DatePickerSkin to get the calendar look and function.
Pros: Less coding needed as the template, DatePicker, is already available. Thus, more time can be spent on other functions related to the calendar.
Cons: Overall look is fixed.
Alternative 2: Design a calendar using JavaFX
Pros: Fully customizable.
Cons: Much effort required to ensure it is bug free.
Aspect: Loading of data to Calendar
Alternative 1 (current choice): Use address book data that is passed to the CalendarPanel through Model
Pros: Able to retrieve updated data from UniquePersonList and UniqueTaskList that are already available.
Cons: Increase coupling with Person and Task.
Alternative 2: Create a separate UniqueMarkDateList that stores required dates with relevant information (e.g. Person’s name and Task’s description)
Pros: Reduces coupling as the data will be stored during initialisation of address book and addition/deletion of person/task.
Cons: We must ensure that the data stored is bound to the individual person and task, such that editing of such person/task will be reflected.
4.14. Undo/Redo mechanism
The undo/redo mechanism is facilitated by an UndoRedoStack, which resides inside LogicManager. It supports undoing and redoing of commands that modifies the state of the address book (e.g. add, edit). Such commands will inherit from UndoableCommand.
UndoRedoStack only deals with UndoableCommands. Commands that cannot be undone will inherit from Command instead. The following diagram shows the inheritance diagram for commands:
As you can see from the diagram, UndoableCommand adds an extra layer between the abstract Command class and concrete commands that can be undone, such as the DeleteCommand. Note that extra tasks need to be done when executing a command in an undoable way, such as saving the state of the address book before execution. UndoableCommand contains the high-level algorithm for those extra tasks while the child classes implements the details of how to execute the specific command. Note that this technique of putting the high-level algorithm in the parent class and lower-level steps of the algorithm in child classes is also known as the template pattern.
Commands that are not undoable are implemented this way:
public class ListCommand extends Command {
    @Override
    public CommandResult execute() {
        // ... list logic ...
    }
}
With the extra layer, the commands that are undoable are implemented this way:
public abstract class UndoableCommand extends Command {
    @Override
    public CommandResult execute() {
        // ... undo logic ...

        executeUndoableCommand();
    }
}

public class DeleteCommand extends UndoableCommand {
    @Override
    public CommandResult executeUndoableCommand() {
        // ... delete logic ...
    }
}
Suppose that the user has just launched the application. The UndoRedoStack will be empty at the beginning.
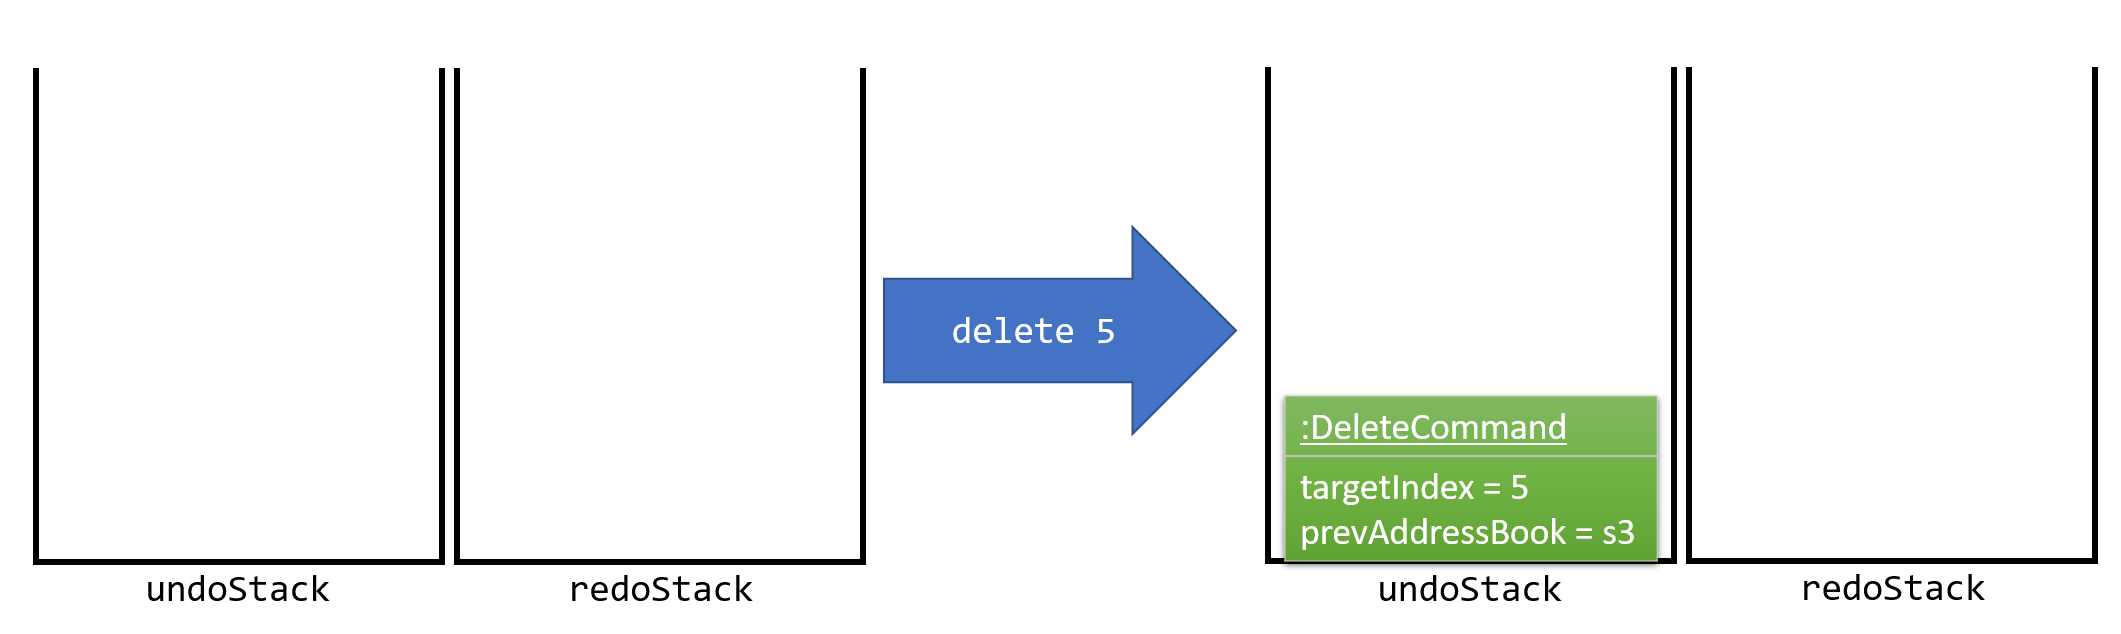
The user executes a new UndoableCommand, delete 5, to delete the 5th person in the address book. The current state of the address book is saved before the delete 5 command executes. The delete 5 command will then be pushed onto the undoStack (the current state is saved together with the command).
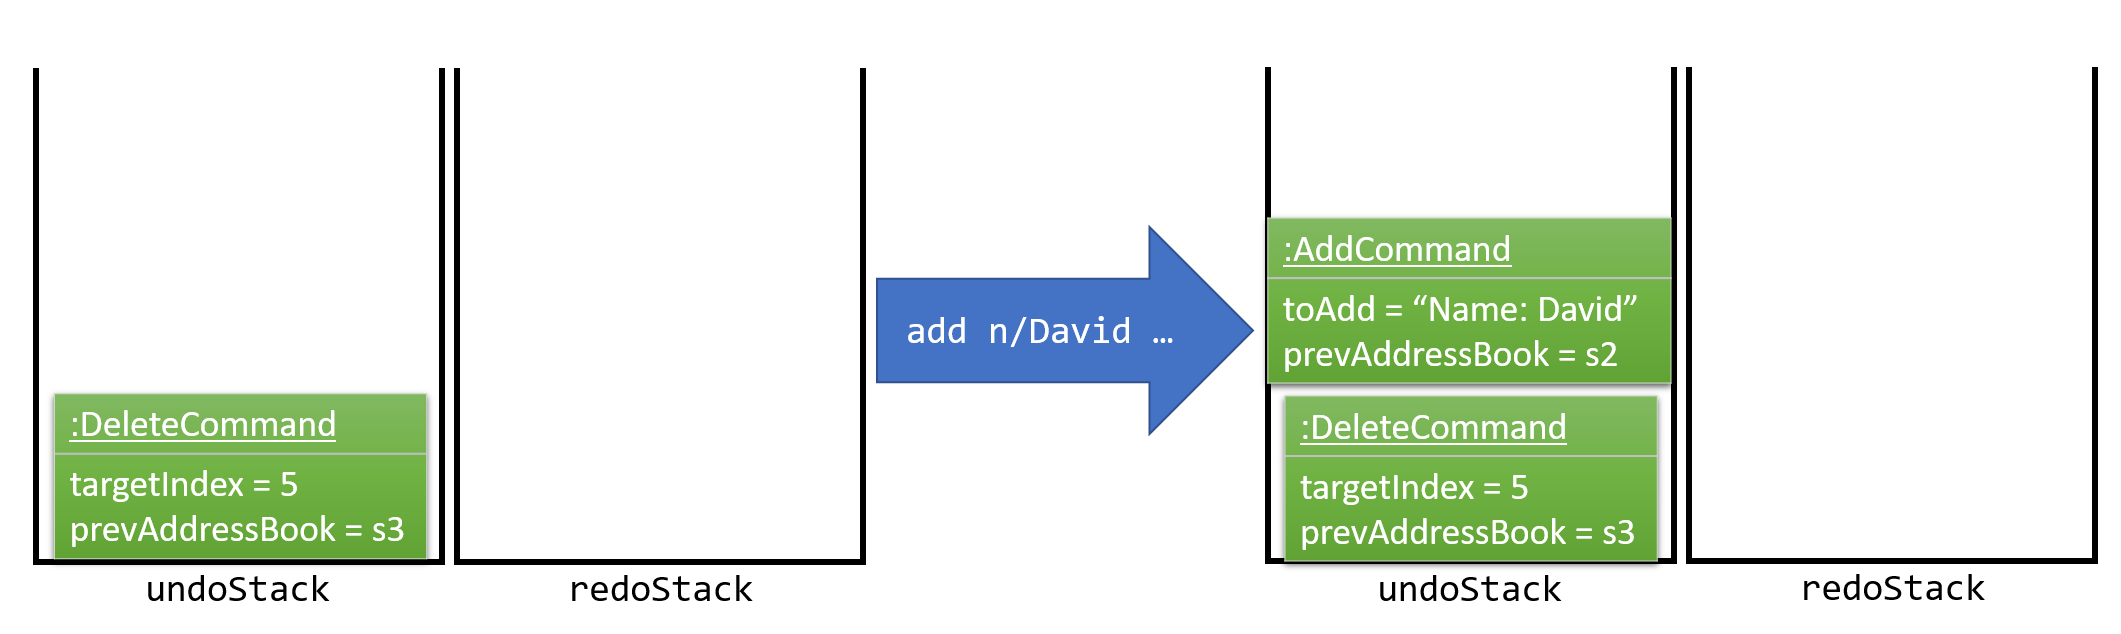
As the user continues to use the program, more commands are added into the undoStack. For example, the user may execute add n/David … to add a new person.
If a command fails its execution, it will not be pushed to the UndoRedoStack at all.
|
The user now decides that adding the person was a mistake, and decides to undo that action using undo.
We will pop the most recent command out of the undoStack and push it back to the redoStack. We will restore the address book to the state before the add command executed.

If the undoStack is empty, then there are no other commands left to be undone, and an Exception will be thrown when popping the undoStack.
|
The following sequence diagram shows how the undo operation works:
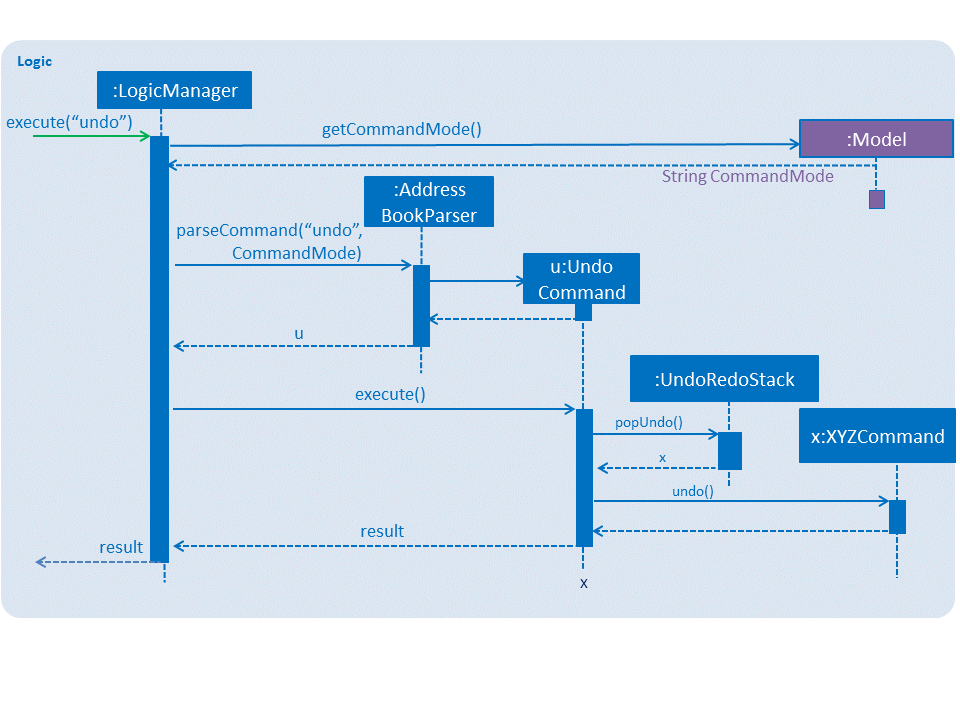
The redo does the exact opposite (pops from redoStack, push to undoStack, and restores the address book to the state after the command is executed).
If the redoStack is empty, then there are no other commands left to be redone, and an Exception will be thrown when popping the redoStack.
|
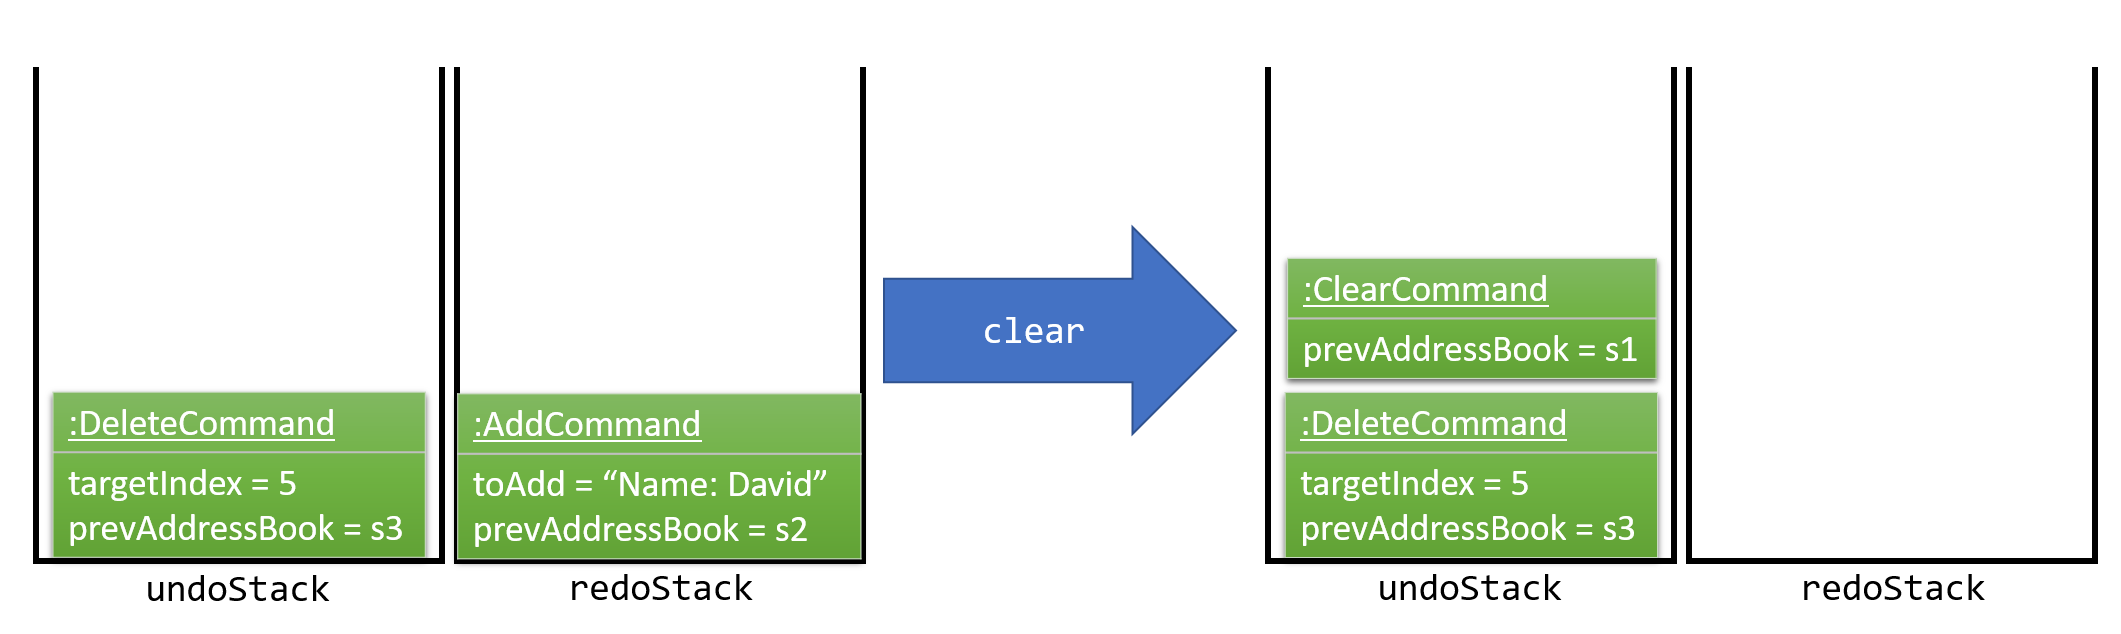
The user now decides to execute a new command, clear. As before, clear will be pushed into the undoStack. This time the redoStack is no longer empty. It will be purged as it no longer make sense to redo the add n/David command (this is the behavior that most modern desktop applications follow).
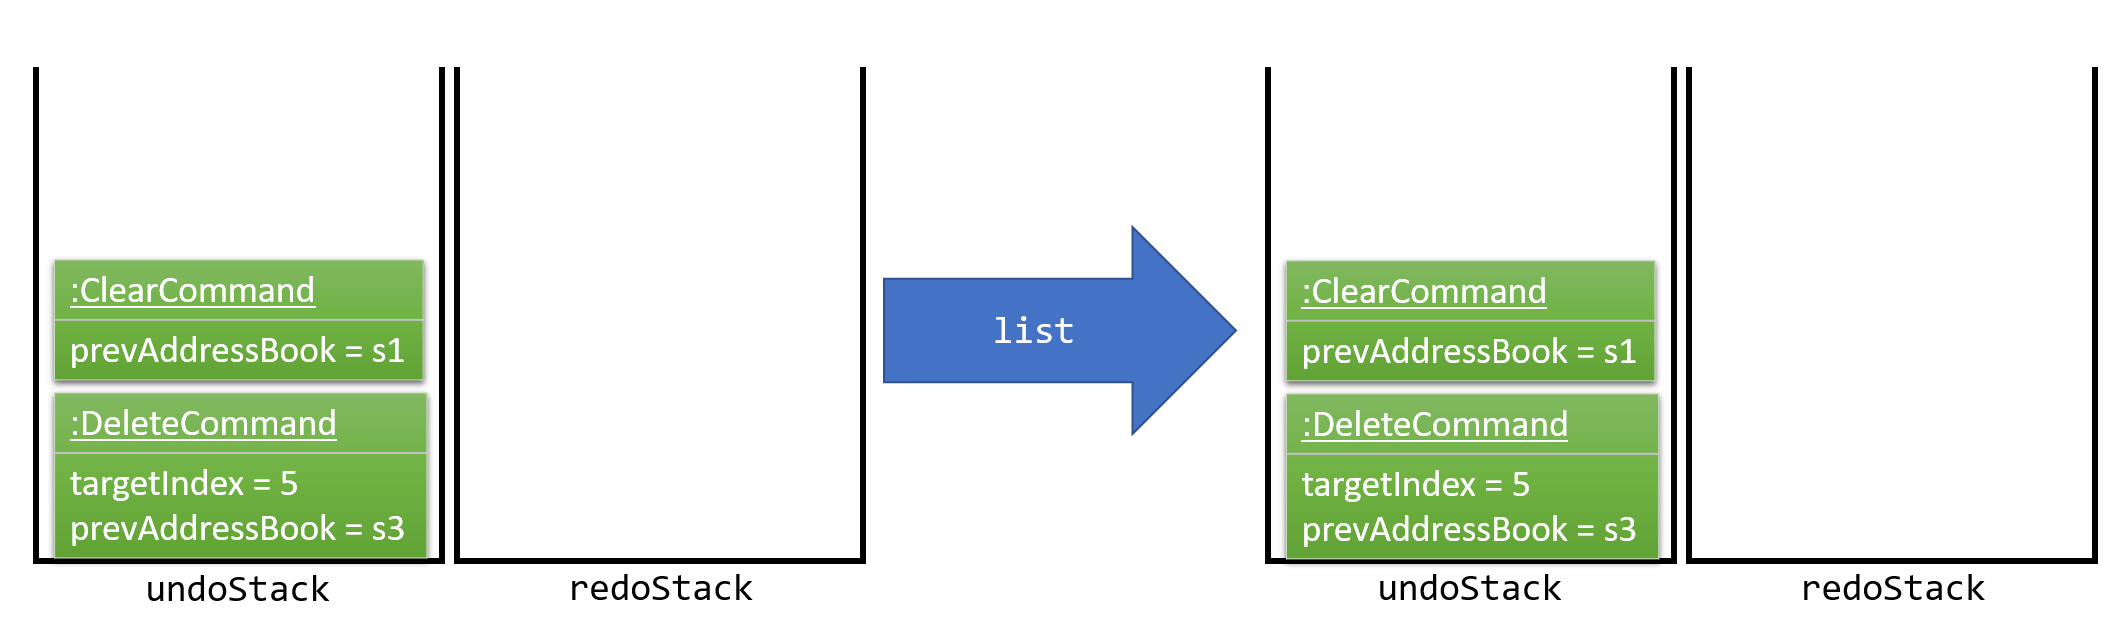
Commands that are not undoable are not added into the undoStack. For example, list, which inherits from Command rather than UndoableCommand, will not be added after execution:
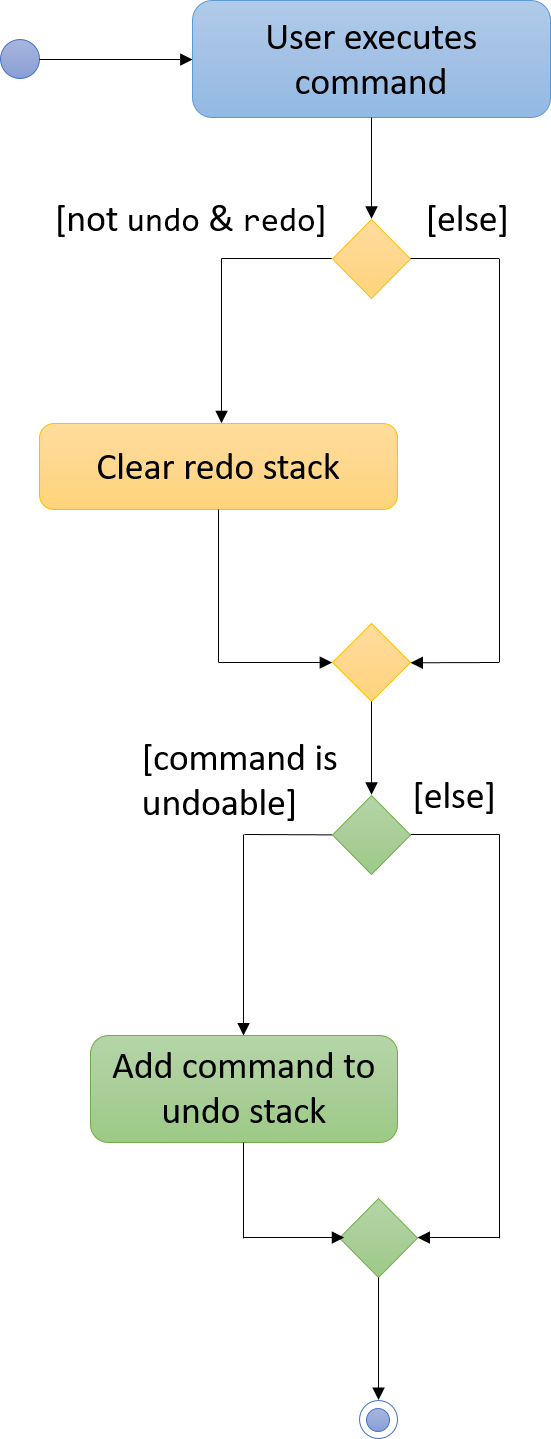
The following activity diagram summarize what happens inside the UndoRedoStack when a user executes a new command:
Design Considerations
Aspect: Implementation of UndoableCommand
Alternative 1 (current choice): Add a new abstract method executeUndoableCommand()
Pros: We will not lose any undone/redone functionality as it is now part of the default behaviour. Classes that deal with Command do not have to know that executeUndoableCommand() exist.
Cons: Hard for new developers to understand the template pattern.
Alternative 2: Just override execute()
Pros: Does not involve the template pattern, easier for new developers to understand.
Cons: Classes that inherit from UndoableCommand must remember to call super.execute(), or lose the ability to undo/redo.
Aspect: How undo & redo executes
Alternative 1 (current choice): Saves the entire address book.
Pros: Easy to implement.
Cons: May have performance issues in terms of memory usage.
Alternative 2: Individual command knows how to undo/redo by itself.
Pros: Will use less memory (e.g. for delete, just save the person being deleted).
Cons: We must ensure that the implementation of each individual command are correct.
Aspect: Type of commands that can be undone/redone
Alternative 1 (current choice): Only include commands that modifies the address book (add, clear, edit).
Pros: We only revert changes that are hard to change back (the view can easily be re-modified as no data are lost).
Cons: User might think that undo also applies when the list is modified (undoing filtering for example), only to realize that it does not do that, after executing undo.
Alternative 2: Include all commands.
Pros: Might be more intuitive for the user.
Cons: User have no way of skipping such commands if he or she just want to reset the state of the address book and not the view.
Additional Info: See our discussion here.
Aspect: Data structure to support the undo/redo commands
Alternative 1 (current choice): Use separate stack for undo and redo
Pros: Easy to understand for new Computer Science student undergraduates to understand, who are likely to be the new incoming developers of our project.
Cons: Logic is duplicated twice. For example, when a new command is executed, we must remember to update both HistoryManager and UndoRedoStack.
Alternative 2: Use HistoryManager for undo/redo
Pros: We do not need to maintain a separate stack, and just reuse what is already in the codebase.
Cons: Requires dealing with commands that have already been undone: We must remember to skip these commands. Violates Single Responsibility Principle and Separation of Concerns as HistoryManager now needs to do two different things.
5. Logging
We are using java.util.logging package for logging. The LogsCenter class is used to manage the logging levels and logging destinations.
-
The logging level can be controlled using the
logLevelsetting in the configuration file (See Configuration) -
The
Loggerfor a class can be obtained usingLogsCenter.getLogger(Class)which will log messages according to the specified logging level -
Currently log messages are output through:
Consoleand to a.logfile.
Logging Levels
-
SEVERE: Critical problem detected which may possibly cause the termination of the application -
WARNING: Can continue, but with caution -
INFO: Information showing the noteworthy actions by the App -
FINE: Details that is not usually noteworthy but may be useful in debugging e.g. print the actual list instead of just its size
6. Configuration
Certain properties of the application can be controlled (e.g App name, logging level) through the configuration file (default: config.json).
7. Documentation
We use asciidoc for writing documentation.
| We chose asciidoc over Markdown because asciidoc, although a bit more complex than Markdown, provides more flexibility in formatting. |
7.1. Editing Documentation
See UsingGradle.adoc to learn how to render .adoc files locally to preview the end result of your edits.
Alternatively, you can download the AsciiDoc plugin for IntelliJ, which allows you to preview the changes you have made to your .adoc files in real-time.
7.2. Publishing Documentation
See UsingTravis.adoc to learn how to deploy GitHub Pages using Travis.
7.3. Converting Documentation to PDF format
We use Google Chrome for converting documentation to PDF format, as Chrome’s PDF engine preserves hyperlinks used in webpages.
Here are the steps to convert the project documentation files to PDF format.
-
Follow the instructions in UsingGradle.adoc to convert the AsciiDoc files in the
docs/directory to HTML format. -
Go to your generated HTML files in the
build/docsfolder, right click on them and selectOpen with→Google Chrome. -
Within Chrome, click on the
Printoption in Chrome’s menu. -
Set the destination to
Save as PDF, then clickSaveto save a copy of the file in PDF format. For best results, use the settings indicated in the screenshot below.
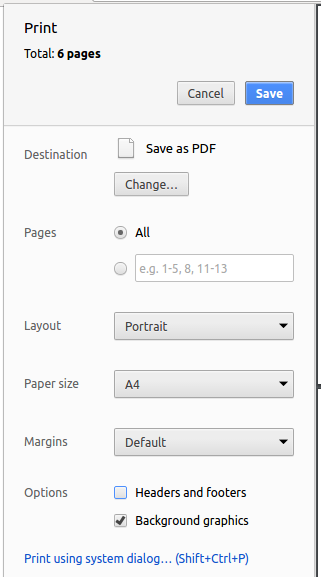
Figure 5.6.1 : Saving documentation as PDF files in Chrome
8. Testing
8.1. Running Tests
There are three ways to run tests.
| The most reliable way to run tests is the 3rd one. The first two methods might fail some GUI tests due to platform/resolution-specific idiosyncrasies. |
Method 1: Using IntelliJ JUnit test runner
-
To run all tests, right-click on the
src/test/javafolder and chooseRun 'All Tests' -
To run a subset of tests, you can right-click on a test package, test class, or a test and choose
Run 'ABC'
Method 2: Using Gradle
-
Open a console and run the command
gradlew clean allTests(Mac/Linux:./gradlew clean allTests)
| See UsingGradle.adoc for more info on how to run tests using Gradle. |
Method 3: Using Gradle (headless)
Thanks to the TestFX library we use, our GUI tests can be run in the headless mode. In the headless mode, GUI tests do not show up on the screen. That means the developer can do other things on the Computer while the tests are running.
To run tests in headless mode, open a console and run the command gradlew clean headless allTests (Mac/Linux: ./gradlew clean headless allTests)
8.2. Types of tests
We have two types of tests:
-
GUI Tests - These are tests involving the GUI. They include,
-
System Tests that test the entire App by simulating user actions on the GUI. These are in the
systemtestspackage. -
Unit tests that test the individual components. These are in
seedu.address.uipackage.
-
-
Non-GUI Tests - These are tests not involving the GUI. They include,
-
Unit tests targeting the lowest level methods/classes.
e.g.seedu.address.commons.StringUtilTest -
Integration tests that are checking the integration of multiple code units (those code units are assumed to be working).
e.g.seedu.address.storage.StorageManagerTest -
Hybrids of unit and integration tests. These test are checking multiple code units as well as how the are connected together.
e.g.seedu.address.logic.LogicManagerTest
-
8.3. Troubleshooting Testing
Problem: HelpWindowTest fails with a NullPointerException.
-
Reason: One of its dependencies,
UserGuide.htmlinsrc/main/resources/docsis missing. -
Solution: Execute Gradle task
processResources.
9. Dev Ops
9.1. Build Automation
See UsingGradle.adoc to learn how to use Gradle for build automation.
9.2. Continuous Integration
We use Travis CI and AppVeyor to perform Continuous Integration on our projects. See UsingTravis.adoc and UsingAppVeyor.adoc for more details.
9.3. Making a Release
Here are the steps to create a new release.
-
Update the version number in
MainApp.java. -
Generate a JAR file using Gradle.
-
Tag the repo with the version number. e.g.
v0.1 -
Create a new release using GitHub and upload the JAR file you created.
9.4. Managing Dependencies
A project often depends on third-party libraries. For example, Address Book depends on the Jackson library for XML parsing. Managing these dependencies can be automated using Gradle. For example, Gradle can download the dependencies automatically, which is better than these alternatives.
a. Include those libraries in the repo (this bloats the repo size)
b. Require developers to download those libraries manually (this creates extra work for developers)
Appendix A: User Stories
Priorities: High (must have) - * * *, Medium (nice to have) - * *, Low (unlikely to have) - *
| Priority | As a … | I want to … | So that I can… |
|---|---|---|---|
|
new user |
see usage instructions |
refer to instructions when I forget how to use the App |
|
user |
add a new person |
|
|
user |
delete a person |
remove entries that I no longer need |
|
user |
find a person by name |
locate details of persons without having to go through the entire list |
|
advanced user |
enter command with shorter prefix |
enhance my efficiency of using the app |
|
clumsy user |
prompt with warning/suggestion when enter invalid details during search |
enter correct details after being reminded |
|
user |
add birthday to person and be reminded when date is near |
know the birthday and prepare in advance |
|
user |
find a person by address, birthday, phone, tags |
locate details of persons when name is forgotten |
|
user |
add a new person leaving out any details other than name |
add a person that I am not familiar with |
|
user |
edit details of a person |
change person’s details without removing and adding the person again |
|
new user |
see suggested commands as I type them |
easily remember what to write without referring to the help sheet |
|
user |
edit information about a contact without retyping everything |
save time and work |
|
user |
add or delete multiple users in one go |
save time by not repeating commands |
|
user |
tag people using any tag |
organize my contacts and add other pertinent information about them |
|
user |
use case-insensitive commands |
type or retype commands in a specific case |
|
user |
conduct the search quickly and efficiently |
save time |
|
user |
tag multiple people using the same tag |
save time |
|
user |
see my most frequently contacted people at the top of the list |
contact them quickly |
|
user with international contacts |
see the local time of my contacts |
keep from calling someone at odd hours |
|
busy user |
see an overview of my schedule, such as tasks and birthday |
know what is coming up next at a glance |
|
advanced user |
shorten commands |
work efficiently |
|
user |
send selected contacts to others |
share them without others having to type it in |
|
user using a public computer |
set a password to lock my stored data |
be free of security related worries |
|
user |
merge multiple duplicate contacts simultaneously |
save time and have a clean addressbook |
|
user |
locate my contacts if their location services are enabled and they are nearby |
meet up with more people |
|
user |
link my addressbook contacts to their social media accounts |
keep updated on their latest posts from a single platform |
|
user |
have addressbook update my contacts automatically when they change them |
have their latest information without updating it manually |
|
user |
have photographs attached to my contacts |
recognize them easily |
|
user |
have common and emergency contacts preloaded in the addressbook |
access them without adding them myself |
|
user |
store multiple phone numbers or emails for the same contact |
avoid making duplicate contacts with slightly different information |
|
OTG user |
access addressbook on multiple platforms and synchronize my data |
have my contacts close at hand from anywhere |
|
user |
use tags to send mass emails or texts to people |
save time sending them individually |
|
user |
add tasks |
manage my schedule |
|
user |
edit tasks |
keep up to date with changes |
|
user |
delete tasks |
remove entries I no longer need |
|
user |
archive completed tasks |
have a record of tasks I have finished |
|
unsure user |
add tasks with or without deadlines |
manage my schedule without knowing every detail |
|
user |
hide private contact details by default |
minimize chance of someone else seeing them by accident |
|
user |
have nicknames associated with each contact while searching |
recognize them better |
|
user |
see mutual contacts |
find out who knows who |
|
user with many persons in the address book |
sort persons by name |
locate a person easily |
Appendix B: Use Cases
(For all use cases below, the System is the AddressBook and the Actor is the user, unless specified otherwise)
B.1. Use case: Delete person
MSS
-
User requests to list persons
-
AddressBook shows a list of persons
-
User requests to delete a specific person in the list
-
AddressBook deletes the person
Use case ends.
Extensions
-
2a. The list is empty.
Use case ends.
-
3a. The given index is invalid.
-
3a1. AddressBook shows an error message.
Use case resumes at step 2.
-
B.2. Use case: Find person
MSS
-
User requests to find person
-
User enters the category (i.e. name/address/tag/phone) and details to search for person
-
AddressBook shows the list of persons with the details
Use case ends. Extensions
-
2a. The category entered is invalid.
-
2a1. AddressBook shows an error message.
-
2a2. AddressBook prompts user to type from a list of categories.
-
2a3. User enters new category.
-
Steps 2a1 - 2a3 are repeated until valid category is entered.
-
User resumes from step 3.
-
-
2b. The detail entered is invalid.
-
2b1. AddressBook shows an error message.
Use case ends.
-
-
2c. The list is empty.
Use case ends.
B.3. Use Case: Edit details of person
MSS
-
User requests to list persons
-
AddressBook shows a list of persons
-
User requests to edit details of a specific person in the list
-
AddressBook prompts the category to edit
-
User enters category and new details
-
AddressBook changes the detail of the category of the person
Use case ends.
Extensions
-
2a. The list is empty.
Use case ends.
-
3a. The given index is invalid.
-
3a1. AddressBook shows an error message.
Use case resumes at step 2.
-
-
5a. The given category is invalid.
-
5a1. AddressBook shows an error message.
-
5a2. AddressBook prompts for new entry.
-
5a3. User enters new category and detail.
-
Repeat 5a1-5a3 until valid category is entered.
-
User resumes from step 6.
-
B.4. Use Case: Tag multiple people with the same tag
-
User requests to list people.
-
Addressbook lists all contacts.
-
User requests to tag multiple with one tag using their index.
-
Addressbook adds tags to all specified contacts.
Use case ends.
Extensions
-
2a. The list is empty.
Use case ends.
-
3a. The given index is invalid.
-
3a1. AddressBook shows an error message.
Use case resumes at step 2.
-
B.5. Use Case: Remove tag of multiple people
-
User requests to list people.
-
Addressbook lists all contacts.
-
User requests to detag a specific tag of multiple person using their index.
-
Addressbook removes tag of all specified contacts.
Use case ends.
Extensions
-
2a. The list is empty.
Use case ends.
-
3a. The given index is invalid.
-
3a1. AddressBook shows an error message.
Use case resumes at step 2.
-
-
3b. The given tag is invalid
-
3b1. AddressBook shows an error message.
Use case resumes at step 2.
-
B.6. Use Case: Find a person using tags
-
User requests to find person.
-
User enters the category (i.e. tag) and details to search for person.
-
AddressBook shows the list of persons with the details.
Use case ends.
Extensions
-
2a. The category entered is invalid.
-
2a1. AddressBook shows an error message.
-
2a2. AddressBook prompts user to type from a list of categories.
-
2a3. User enters new category.
-
Steps 2a1 - 2a3 are repeated until valid category is entered.
-
User resumes from step 3.
-
-
2b. The detail entered is invalid.
-
2b1. AddressBook shows an error message.
Use case ends.
-
-
2c. The list is empty.
Use case ends.
Appendix C: Non Functional Requirements
-
Should work on any mainstream OS as long as it has Java
1.8.0_60or higher installed. -
Should be able to hold up to 1000 persons without a noticeable sluggishness in performance for typical usage.
-
A user with above average typing speed for regular English text (i.e. not code, not system admin commands) should be able to accomplish most of the tasks faster using commands than using the mouse.
-
Should respond to user commands within 2 seconds.
-
Should return accurate search results for duplicate contacts by at least 70%.
-
Should have a backup storage file to store data in case of data loss from main file.
-
The project is expected to adhere to a schedule that delivers at least one feature every week.
Appendix D: Glossary
Mainstream OS
Windows, Linux, Unix, OS-X
Private contact detail
A contact detail that is not meant to be shared with others
Appendix E: Product Survey
Addapt
Author: Not found.
Pros:
-
Synchronizes contact information of everyone in the network.
-
Allows auto updating of contact information in real time.
-
Facilitates group communication.
-
Good for business environments.
-
Free.
Cons:
-
Only available on iOS or Android.
-
Features can be used if people in your network also have the same application.
-
Has a steep learning curve.